Onn 6 in 1 Universal Remote Manual Codes
Below are the instructions guide that will help you learn how to program and use your Onn 6 in 1 universal remote control. The topics covered in the manual include:-
- Getting Started (Batteries)
- Getting Started (Buttons)
- Programming Your Remote (Direct Code Entry)
- Programming Your Remote (Auto Code Search)
- Favorite Channels
- Volume Lock
- Channel Lock
- Code Identification
- Reset To Factory Default Settings
- Troubleshooting
- Fcc Information
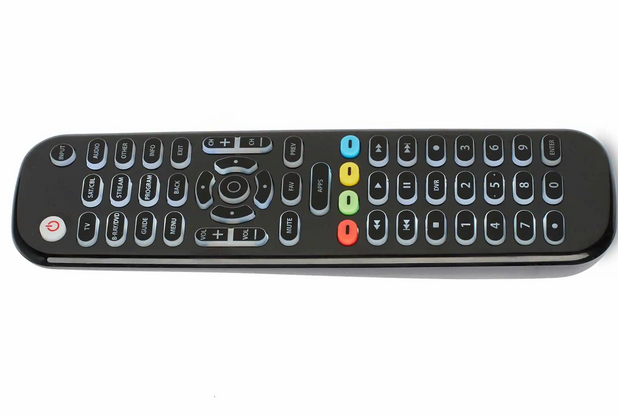
We appreciate your decision to use the ONN universal remote control. This remote control can control a variety of electronic devices, is compatible with most manufacturers and models, and is pre-programmed to run many Samsung TVs (if your device is incompatible, check the Programming Your Remote sections).
Your remote is astonishingly simple to set up and can manage up to 6 devices. Please insert two AA alkaline batteries before beginning.
Getting Started: Installing The Batteries
1. Open the battery cover.
2. Put the batteries in as instructed.
3. Reinstall the battery cover with a snap.
Battery Safety Measures
• Avoid combining fresh and used batteries.
• Alkaline, regular (carbon-zinc), and rechargeable (nickel-cadmium) batteries should not be mixed.
• Removing weak, worn-out, or old batteries as soon as possible and recycling or disposing of them in line with local and federal requirements are best practices.
Low Battery Warning
The batteries need to be changed if the button’s red indicator light flashes three times while the remote is in use. When this indicator appears, replace the batteries as soon as you can.
Code Saver
Please be quick while replacing the batteries in your remote. Your remote’s batteries can be changed without erasing programmed codes if you do so within 20 minutes.
Battery Safety
If any of the remote button is pressed for more than 60 seconds, the remote will automatically turn off to save battery life (except during programming). This functionality comes in handy if the remote becomes stuck somewhere where the buttons are stuck, like between cushions on a couch.
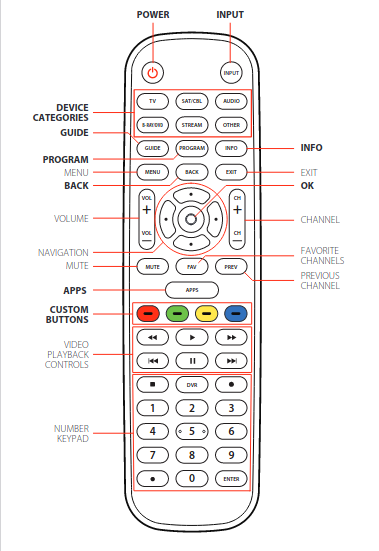
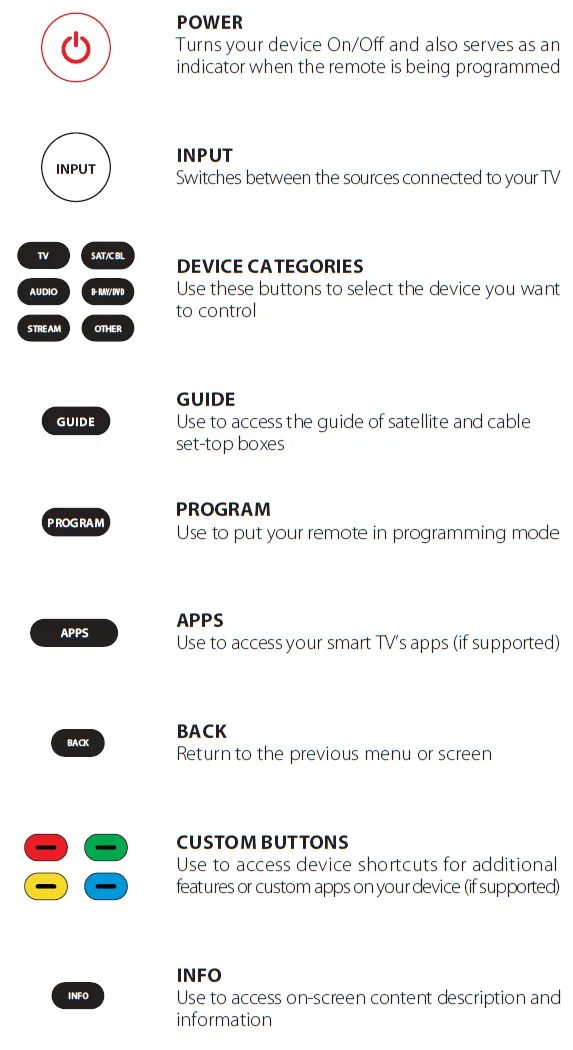
Getting Started: Buttons
Below are the buttons and their various functions
Programming Your Onn 6 in 1 Universal Remote
Your remote’s programming is simple. Please follow these three easy steps and make sure the device you wish to control is turned on before you start.
NOTE: A lot of Samsung TVs can be operated using the ONN universal remote.
Programming Your Onn 6 in 1 remote (Direct code entry method)
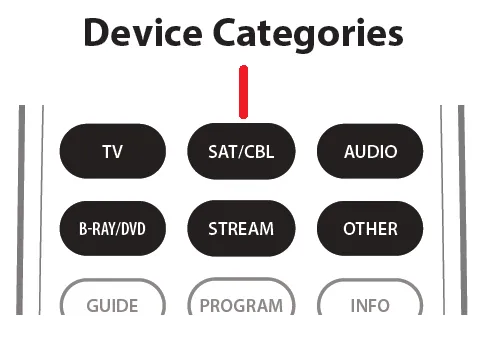
Choose the desired device from the Device Categories. The red indicator light on the button blinks once and then stays lit.
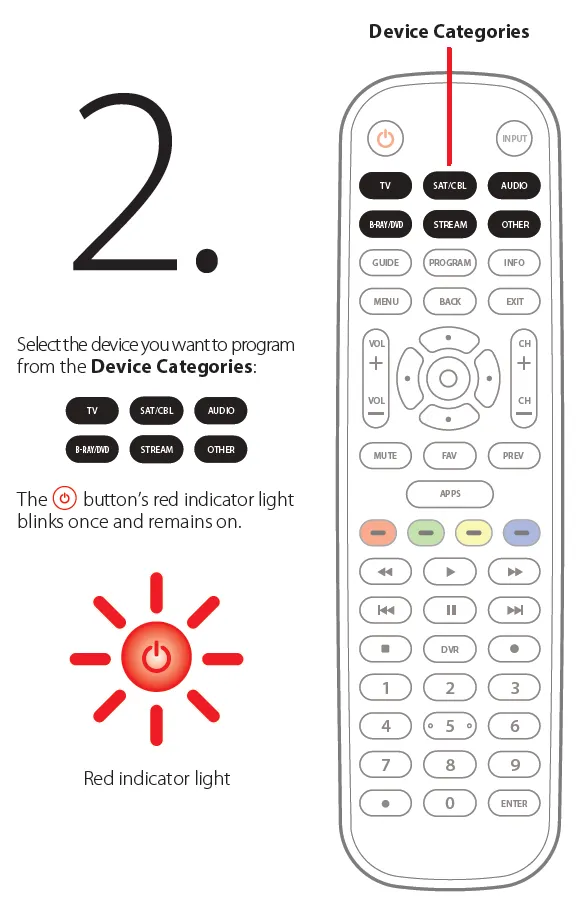
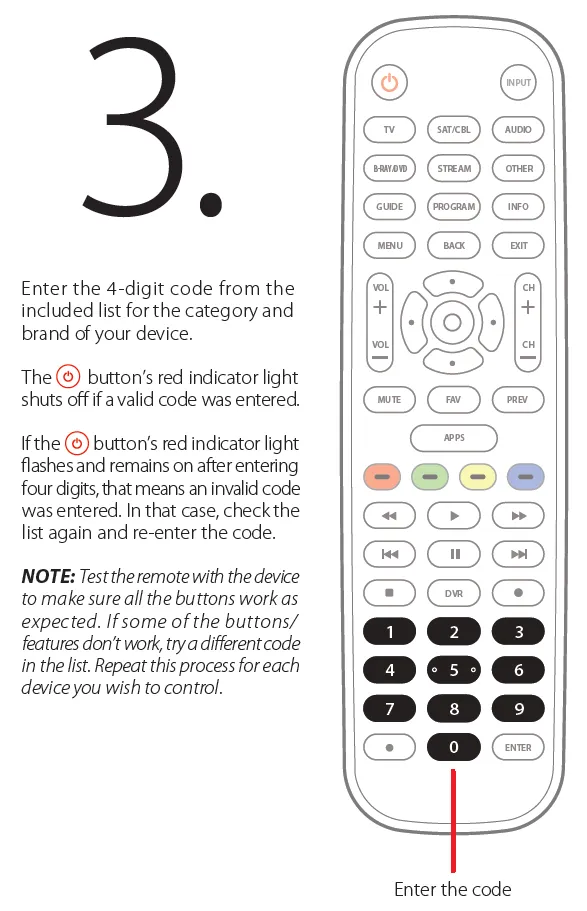
For the category and brand of your device, enter the four-digit code from the list provided. If a correct code was entered, the red indicator light on the button will turn off. After inputting four digits, if the red indicator light on the button continues to flash, an invalid code was entered. In that scenario, double-check the list and enter the code once more.
NOTE: Check that all of the buttons on the remote’s device are functional before using it. Try an alternative code from the list if a few of the buttons or functions aren’t functioning. To operate each gadget, follow these steps again.
Programming Your Remote (Auto Code Search)
Although the Direct Code Entry approach is advised for programming remotes, if you were unable to discover a code that worked with your device using that method, you can attempt the “Auto Code Search” method described below:
1. Turn on the machine you want to manage.
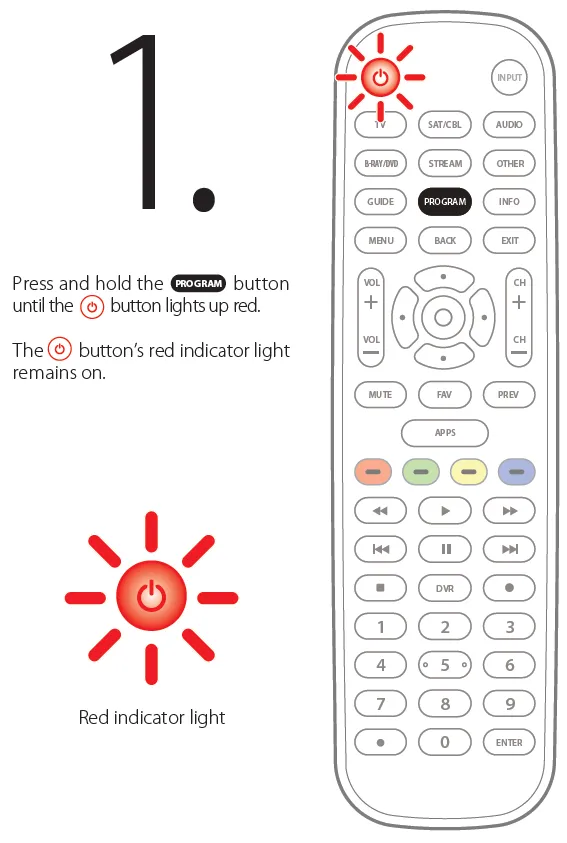
2. When the POWER button turns red, click and maintain the PROGRAM button. Red indicator light on the button stays on.
3. Choose the device you want to control from the Device Categories. The red indicator light on the POWER button blinks once and then stays lit.
NOTE: If you are unclear of the device category, please refer to the list below.
- TV: TV, TV/DVD and other TV combinations.
- SAT/CBL: Satellite, Cable, DVR, and other set-top boxes.
- AUDIO: Sound Bars, Audio Receivers, and other audio devices.
- B-RAY/DVD: Blu-ray Players and DVD Players.
- STREAM: Roku, Apple TV, Xbox, and other streaming media players.
- OTHER: VCRs, Digital Frames, and devices not found on the code list.
You can control a device by pointing the remote at it and holding down the OK button until you see the gadget turn off. As the codes are tested, the red indicator light on the POWER button will blink.
Release the OK button as soon as the gadget turns off to lock in the code. The red indicator light on the POWER button will go off.
To ensure that all the buttons on the remote function as they should, test it with the gadget. Repeat the procedure or attempt the Direct Code Entry approach if some of the buttons or functionalities don’t function.
NOTE: Scanning all potential codes for your gadget may take longer than 10 minutes. If you accidentally or purposefully pressed the OK button during the Auto Code Search, you can resume the code search from where it left off by repeating steps 1 through 5.
The red indicator light on the remote’s POWER button blinks three times before going out when the Auto Code Search has used all of the codes available for the chosen category. Try the Direct Code Entry technique if none of the codes were successful with your device.
Access Your Favorite Channel Using the Onn Remote
Follow the instructions below to get immediate access to up to 10 of your favorite programs.
- Choose a device that manages the channels from the Device Categories. The red indicator light on the POWER button will pulse once.
- When the POWER button turns red, press and hold the PROGRAM button. The red indicator light on the POWER button is still on.
- Select FAV from the menu. The red indicator light on the POWER button blinks once and then stays lit.
- Decide the button (0–9) you want to use to store your favorite channels. The red indicator light on the POWER button blinks once and then stays lit.
- Put in the channel number you want to set up as your favorite.
- When you press the FAV button, the channel is saved and the red indicator light on the POWER button goes off.
To access your preferred channels:
- Select FAV from the menu. The red indicator on the POWER button turns on and stays on.
- Press the assigned button for your preferred channel to access it (0-9). The red indicator light on the POWER button blinks before going out when the instruction is given.
VOLUME LOCK Feature
Utilize this function to lock a device to the volume control on the remote. The volume buttons on the remote, for instance, might be used to control your sound bar when in TV mode.
Activating The Volume Lock
When the POWER button turns red, hold and press the PROGRAM button. The red indicator light on the POWER button remains on.
Choose a device from the Device Categories to which you want to bind the volume control on the remote to. The red indicator light on the POWER button blinks once and then stays lit.
Select VOL+ and press it. The red indicator light on the POWER button blinks once and then stays lit. Click the “OK” button. The red indicator light on the POWER button will flicker twice before going off.
Turning off Volume Lock:
The PROGRAM button must be pressed and held down till it turns red. The red indicator light on the POWER button remains lit.
Hit the VOL- key. The red indicator light on the POWER button blinks once and then stays lit.
Click the “OK” button. The red indicator light on the POWER button will flicker twice before going off.
NOTE: Since most modern HDMI-connected devices already have this feature built-in, the Volume Lock option may not be essential.
CHANNEL-LOCK Feature
Utilize this function to lock a device to the channel control of the remote. The channel buttons on the remote, for instance, can be set to manage your satellite or cable box while the TV is on.
Setting up Channel Lock
The PROGRAM button must be pressed and held down until it becomes red. The red indicator light on the POWER button remains lit.
Choose the device you wish to lock to the remote’s channel control from the Device Categories. The red indicator light on the POWER button blinks once and then stays lit.
Select CH+ from the menu. The red indicator light on the POWER button blinks once and then stays lit. Click the “OK” button.
The red indicator light on the POWER button will flicker twice before going off.
Disabling Channel Lock
The PROGRAM button must be pressed and held down until it becomes red. The red indicator light on the POWER button is remains lit.
Select CH- from the menu. The red indicator light on the POWER button blinks once and then stays lit. Click the “OK” button. The red indicator light on the POWER button will flicker twice before going off.
NOTE: Since this capability is already included on the majority of more recent HDMI-connected devices, the Channel Lock feature might not be necessary.
Code Identification
Follow the instructions below to find any programmed codes you have.
The PROGRAM button must be pressed and held down until it becomes red. The red indication light on the POWER button remains on.
Choose the device you want the code for from the Device Categories. The red indicator light on the POWER button blinks once and then stays lit.
Select CUSTOM from the menu. The red indicator light on the POWER button blinks once and then stays lit.
Hit (1) to activate. The red indicator light on the POWER button will blink a certain amount of times. This is the number that corresponds to the code’s initial digit. The associated code number is zero if the button does not flash.
To exit, press the CUSTOM button.
NOTE: To leave at any time, simply press CUSTOM.
Resetting Your Onn Universal Remote To Factory Settings
1. The PROGRAM button must be pressed and held down until it becomes red. The red indication light on the POWER button remains lit.
2. Select the INFO option. The red indicator light on the POWER button blinks once and then stays lit.
3. Select OK from the menu. The remote will return to factory settings after the red indicator light on the POWER button flashes twice.
Troubleshooting Your Onn Universal Remote
The advice provided below can assist you in resolving issues and providing information about your remote control.
- Generally speaking, you should always check that the remote is set to the appropriate device category mode (TV, SAT/CBL, AUDIO, B-RAY/DVD, STREAM, OTHER); this instructs the remote which device to control.
- The batteries are correctly placed and brand-new.
- Ensure that nothing stands between both the remote and the unit and that the remote is pointed towards the IR sensor.
My gadget cannot be controlled by the ONN remote
Try the Auto Code Search method if you’ve tried all the code alternatives while utilizing the Direct Code Entry method to enter the codes for your brand and the device is still not working properly.
You must program each appropriate device button to control a specific component of a combo device, such as a TV/VCR or TV/DVD.
My device does not support or function properly with some of the ONN remote’s buttons.
- It’s likely that your gadget doesn’t fully support the code you programmed. Try choosing the following code from the list of possibilities for the brand and category of your device.
- The original remote control for your device might not support all of the buttons.
- It’s possible that you hit an incorrect button for the remote’s device category mode.
My device won’t let me change the channels using the ONN remote.
Make sure the remote is set to the appropriate device category mode for controlling the channels (TV, SAT/CBL, AUDIO, B-RAY/DVD, STREAM, OTHER).
Try entering a channel number and then pressing the ENTER button (this step is necessary with some TV and/or Cable/Satellite box models and manufacturers).
Onn remote not adjusting volume on my device
Make that the volume control function on the remote is set to the appropriate device category (TV, SAT/ CBL, AUDIO, B-RAY/DVD, STREAM, OTHER).