Orbit 27896 6-Station Timer Manual
Both indoor and outdoor mounting options are available for the Orbit 27896 6-station sprinkler system. This sprinkler system timer has simple programming logic that allows you to program up to 6 different zones in your yard, as well as 3 programs for flexible scheduling.
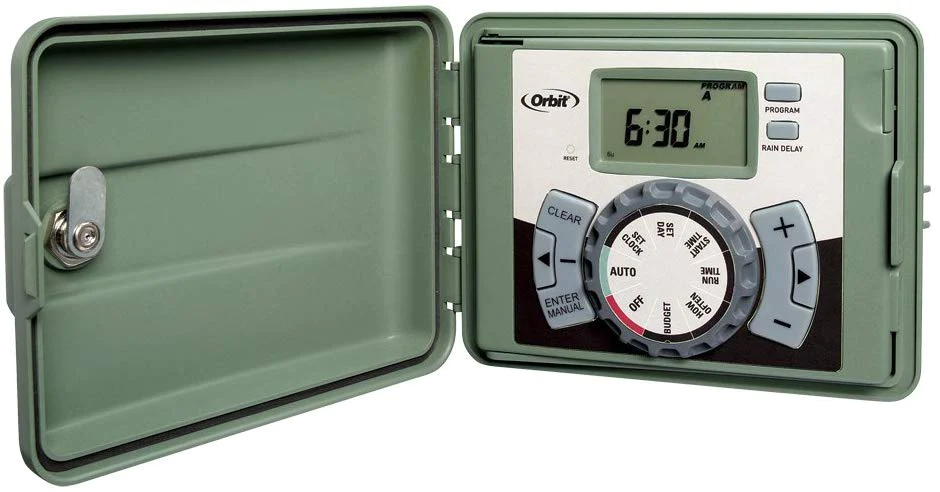
It has a dial and a sizable LCD screen. The Orbit swing door timer is packaged in a weather-resistant cabinet with an inbuilt transformer for simple plug-and-play installations both indoors and outdoors.
Orbit 27896 6-Station Timer Manual
The manual instructions are written in English as well as French. A number of topics are covered in the manual including
- Get to Know Your Timer
- Installation
- Programming with Easy-Set Logic
- Troubleshooting Guide
Get to Know Your Timer
Under this section, you get to learn about the various functions and buttons on your Orbit 27896 timer. The timer has a weather-resistant cabinet, a digital display, a battery compartment as well as dials to manipulate different programming conditions.
Installing the Orbit 27896 Timer
To install this timer, various gadgets are required including a screwdriver and wire strippers.
The first thing you need to do is find an appropriate place to install this timer. Think about the following factors when deciding where to put your timer:
* Select a location close to an electrical outlet or power supply (if hard wiring is used) (applicable only to U .S . retail timers)
* Make sure working temperatures are not below 0° or over 70° Celsius (below 32° or above 158° Fahrenheit).
If at all possible, place it out of direct sunlight. Make sure there is at least 9″ of space to the left of the sprinkler timer box so that the door may swing open after installation. Place the timer where the sprinkler wire can be easily accessed (from valves).
Shut the compartment door if the timer is mounted outside to protect it from weather damage. Insert the key, then spin it clockwise to the locked position to lock.
When mounting, use the mounting template that is given to mark the wall’s location for the mounting screw before mounting the timer. A No. 8 screw (supplied) should be inserted into the wall at the upper template position.
Leave the screw head sticking out from the wall by 1/8″ (3mm). If necessary, for a strong grip in masonry or plaster, use expanding anchors (supplied). Place the timer over the exposed screw (using the keyhole slot at the back of the timer).
Last but not least, insert a No. 8 screw into one of the two prepared holes found in the lower back cabinet.
Wiring Your Orbit 27896 Timer
Remove 1/2″ (12 mm) of the latex wrapping from the ends of the wires for the timer and the valve before connecting them to the time then attach one wire (it doesn’t matter which wire) from each valve to a unique “Common” sprinkler wire (often white).
After that, join the leftover wire from each valve to a distinctive sprinkler wire of a different color. Note: The peak loading for the timer is 500mA, whereas the highest capacity for each station/pump is 250mA.
Use a 20 gauge (AWG) nylon jacketed thermostat cable or Orbit sprinkler wire to link the sprinkler timer to the valves if the separation is less than 700′ (210 m).
Important: Wire nuts, solder, vinyl tape, or both should be used to connect all wires. It is recommended to use Orbit Grease Caps in damp settings, such as a valve box, to guard against water infiltration and prevent connection corrosion.
Each wire’s end should have the plastic insulation removed by 1/2″ (12 mm). Two wires connect each valve. The common connection should be made using one wire, regardless of which one. The station wire that will specifically control that valve needs to be linked to the other valve wire.
One common wire that goes to the controller can be used to connect the common wires for all the valves. Each station should only have one valve attached in order to prevent electrical dangers.
Connecting the Orbit 27896 6 Station Timer To Electrical Power
Apply the necessary safety lockout after cutting off the Power supply at the AC circuit breaker. Using an AC voltmeter that is calibrated for the appropriate measurement range, confirm that the power has been cut off at the installation site.
Use a power feed cable that is at least 14 gauge (AWG) and rated for 155 ℉ (68 degrees Celsius). Conduit and related fittings should be installed. Follow all applicable codes and regional requirements while connecting the AC electrical energy wiring to the source.
Then use a 12″ nipple to connect the junction box to the Timer (Junction box and nipple not included). Following all relevant codes, attach the supply electricity conduit to the junction box’s entry.
A transformer that is already present in the sprinkler timer needs to be linked to an AC line voltage supply. Check the power requirements on the back of the sprinkler timer box. In order to connect outside wall-mounted equipment to AC power, it is typically required by local building and electrical codes to use an authorized electrical conduit and electrical connections.
Please review your area’s laws. Any permanent connection must be made in compliance with the National Electrical Code and applicable state and municipal laws by a qualified electrical contractor.
There are two holes for wire access at the bottom of this sprinkler timer. Connecting a sprinkler timer to a typical electrical junction box requires the use of a 1/2″ Nipple.
Programming Your Orbit 27896 6 Station Timer
Your sprinkler timer gives you the freedom to use three separate programs (A, B, and C). You can save all of your sprinkler settings in a program. It consists of a collection of stations with predetermined start and runs times.
You can run various valves using different programs on various days and for various run times. Even though many applications only need one program (A), drip areas, freshly planted lawns, and rotary sprinkler stations can benefit from using numerous programs.
Irrigation efficiency will be maximized by grouping stations with comparable water requirements using the software. The principal programming can be completed in a few simple steps.
One Reply to “Orbit 27896 6-Station Timer Manual”
Comments are closed.