Hunter X Core Manual
Simple operation and Solar Sync compatibility are offered by this Hunter X Core, an entry-level household controller. The X-Core is the ideal option for residential applications since it offers simple configuration control for up to 8 stations, each with 3 programs and 4 start times.
Install the innovative Solar Sync ET sensor, which adjusts irrigation run periods daily in accordance with local weather measurements. Hunter remotes can also be used with X-Core to quickly and wirelessly activate irrigation.
Setup, use, and upkeep are made to be straightforward while still providing highest productivity and dependability.
2, 4, 6, or 8 stations are possible (fixed models)
- Based on the weather in the area, the Solar Sync® accessory conserves water.
- Outdoor models come with a built-in key lock to prevent vandalism.
- Three adaptable programs with four start times each and run times of up to four hours
- Simple field wiring diagnostics are offered by QuickCheckTM.
- Hide For simplicity, the programs setting only displays one program and one start time.
Up to 99 days may pass without irrigation during the off-season. When short circuit protection detects wiring errors, the station is skipped without causing system harm.
The entire irrigation schedule is backed up in Easy RetrieveTM memory. Delay between Stations for pump recharge or slow-closing valves. In locations with elevation fluctuations or compact soils, Cycle and Soak avoids water waste and runoff.
Seasonal adaptation allows more rapid schedule modifications without affecting run times
Hunter X Core Instructions Manual
There is a 36 page Hunter X core manual available to users that give you the opportunity to understand your gadget and how to use it effectively.
In the manual you will get more information on the components, programming and troubleshooting among other topics.
The X-Core indoor version needs to be set up indoors or in an enclosure because it is not weatherproof or waterproof.
Mounting the Controller
1. Put a screw into the wall first. If you’re mounting to drywall or a stone wall, use screw anchors.
2. Place the screw over the keyhole on top of the controller.
3. Use screws to firmly fix the controller in place by inserting them through the holes on the terminal strip.
The X-Core should only be installed by qualified people.
1. Connect the controller and the control valve location with valve wires.
2. At each valve, connect a common wire to either solenoid wire. This wire is often white in tone. Connect a different control wire to each valve’s remaining wire. Water resistant connectors should be used for all electrical connections.
3. Run the wires for the valve via the conduit. Integrate the conduit into the controller’s bottom right corner.
4. Attach the white valve common wire to the terminal strip’s C (Common) screw. Each individual valve control wire should be connected to the proper station terminals, and the screws should be tightened.
Your X-Core controller comes with a high-power lithium battery. The battery enables remote programming of the controller without an AC power supply. In times of power outages, it is also needed to maintain the time and day.
Download Manual
The actual manual has a lot more details than what is covered here. If you’d like to view it, here is a direct link to pdf file on the Hunter’s website.
Hunter X Core Programming
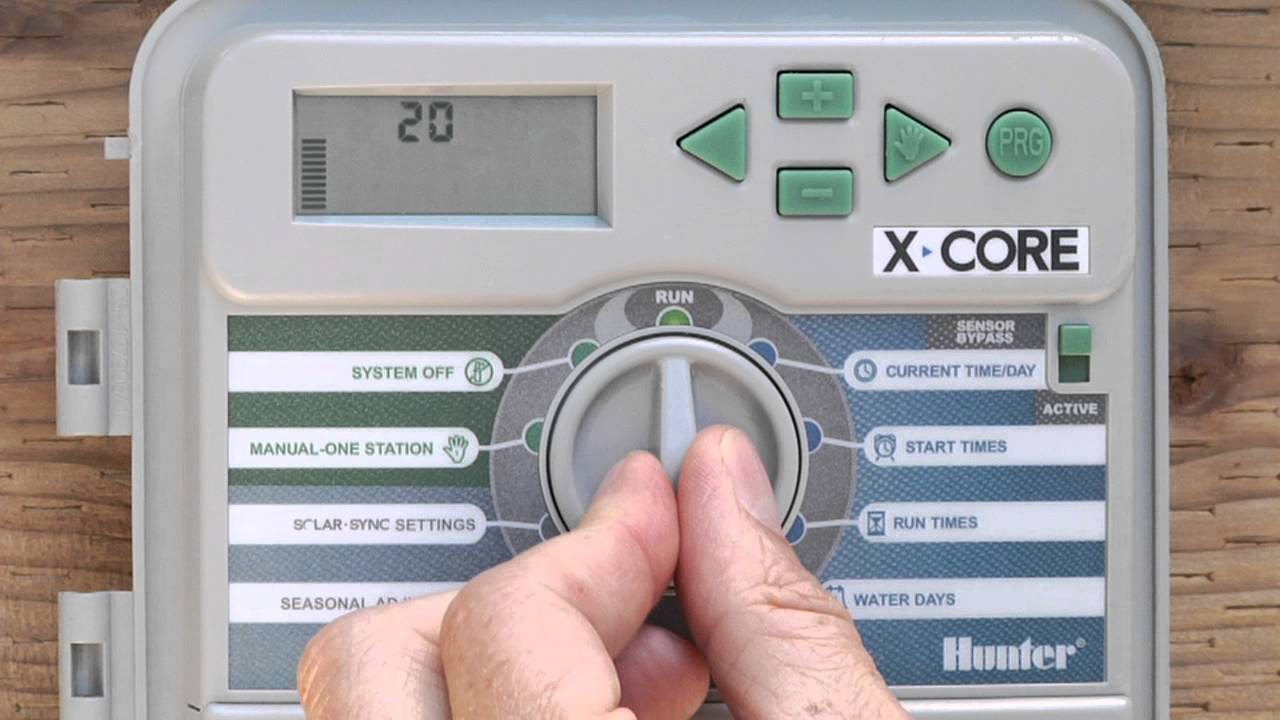
When the controller is not in use, the X-Core display displays the time and day. When the dial is turned, the display modifies to show the precise programming information that needs to be entered. By pushing the relevant buttons during programming, the flashing section of the display can be modified.
Setting the time and date can be achieved by the process below:-
Turn the dial to the CURRENT TIME/DAY position.
2. A flashing year will be displayed. Change the year with the or buttons. Press the button to start setting the month once you’ve chosen the year.
3. The day and month will be displayed. The emblem will be visible and the month will flash. Change the month with the or buttons. To start setting the day, press the button.
4. The icon will be visible and the day will be flashing. Change the day by pressing the or buttons. To start setting the time, press the button.
Your Hunter controller may become smarter by adding a Solar SyncTM, which adjusts watering schedules based on site conditions and local weather conditions.
Independent research has shown that a Hunter controller with Solar Sync offers a long number of water-saving capabilities, and the EPA has certified it as a WaterSense Smart Watering Controller.
Following a local thunderstorm, the controller can be kept in the OFF state for a user-specified length of time thanks to the Programmable Rain Delay feature. This will stop watering during bad weather and switch back to automated programmed irrigation when the delay time is up.
With the push of a button, the QuickCheck feature makes it simple to evaluate field wiring problems. When a field wiring short is discovered on a particular station number, QuickCheck displays an ERR message.
All Hunter controllers powered by AC have auto short circuit security. Electrical defects, which are frequently brought on by wiring problems, are immediately detected by this feature. Only the impacted stations are ignored, allowing the other stations to irrigate as planned at their regular intervals.
As the controller moves from one area to the next, users can set a delay between them. Depending on the needs of the user, this delay can be anywhere from a few seconds (to give slow-closing valves more time to close) to a significant amount of time (to give pressure tanks time to recharge).